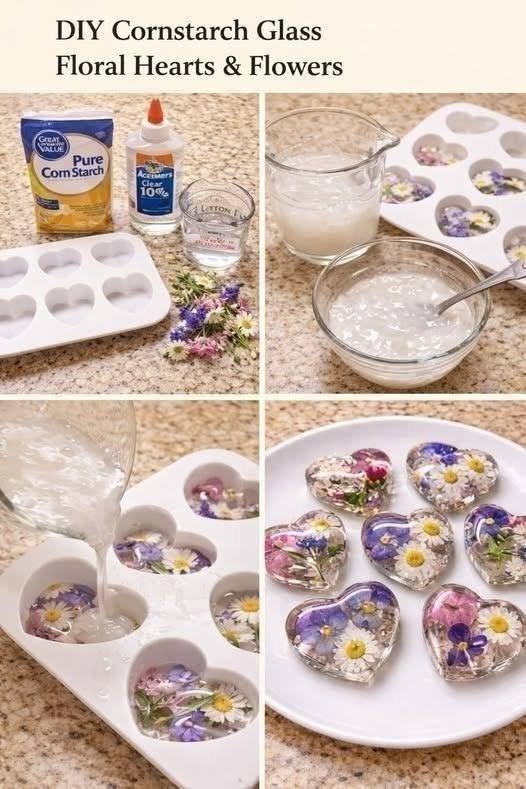
Looking for a creative DIY project that combines delicate floral details with a beautiful glass-like finish? These cornstarch glass floral hearts and flowers are a charming handmade decoration that can brighten your home, add a personal touch to gifts, or become a lovely activity for a relaxing afternoon.
With a few simple craft ingredients, floral molds, and a little patience, you can create decorative hearts and flowers with a translucent, glass-inspired appearance. Customize them with soft pastel colors, dried flowers, glitter, or delicate botanical details to match your personal style.
Although these decorations are inspired by the appearance of glass, the finished pieces are decorative crafts rather than actual glass.
Why You’ll Love This DIY Craft
- Budget-friendly: Uses simple, accessible craft materials.
- Beautiful designs: Create hearts, flowers, and other decorative shapes.
- Customizable: Add colors, dried petals, and glitter.
- Perfect for gifts: Handmade floral decorations make thoughtful presents.
- Versatile: Display them in decorative bowls, use them in craft arrangements, or attach them to gift packaging.
Materials You’ll Need
- 1 cup cornstarch
- ½ cup white school glue (PVA craft glue)
- 1 tablespoon vegetable glycerin
- 1 teaspoon white vinegar
- Silicone heart and flower molds
- A mixing bowl and spoon
- A rolling pin or flat craft tool
- Optional: water-based craft colorants, fine glitter, and small dried flower petals
- Optional: clear water-based craft varnish suitable for the material
Important: This recipe creates an air-dried decorative craft material with a smooth, porcelain-like finish. It will not produce true transparent glass. For a genuinely glass-like translucent result, use a purpose-made clear casting resin or another craft material designed for that effect, following its safety instructions.
Step-by-Step Instructions
Step 1: Prepare Your Workspace
Cover your work surface with a protective sheet and gather your molds and tools. Make sure the silicone molds are clean and dry before you begin.
Choose heart and flower molds with enough detail to give your finished decorations an attractive shape.
Step 2: Mix the Ingredients
Add the cornstarch to a mixing bowl. Gradually stir in the white PVA glue, glycerin, and vinegar.
Mix until the ingredients form a smooth, pliable dough. If the mixture feels too sticky, add a little more cornstarch, one small amount at a time.
If it becomes too dry or crumbly, knead in a tiny amount of glue until it holds together.
Step 3: Add Color and Decorative Details
For a delicate floral look, divide the mixture into smaller portions and tint each portion with a small amount of suitable water-based craft colorant.
Soft pink, lavender, pale blue, ivory, and mint green are lovely choices. You can also leave the mixture white for a classic handmade appearance.
Avoid adding too much liquid colorant, as excess moisture may change the consistency and drying time.
Step 4: Shape the Hearts and Flowers
Take a small portion of the dough and press it firmly into a silicone mold. Make sure the mixture reaches the edges and fills the finer details.
Smooth the back with your fingers or a flat tool. Remove any excess material around the edges for a neat finish.
For added charm, gently press a tiny dried flower petal into the surface while the material is still workable.
Step 5: Remove the Shapes Carefully
Allow the molded pieces to become firm enough to handle before removing them from the molds. Flex the silicone gently to release each heart or flower without damaging its details.
If a piece loses its shape, simply knead the material again and repeat the molding process.
Step 6: Let Them Dry Completely
Place the shapes on a flat, nonstick surface in a dry, well-ventilated area. Leave them to air-dry, turning them occasionally if necessary.
Drying may take several days depending on thickness, humidity, and the ingredients used. Make sure each piece is completely dry before painting or sealing it.
Step 7: Add the Finishing Touches
Once dry, smooth any rough edges gently with fine sandpaper, if appropriate for the material.
You can add fine glitter, delicate painted details, or a compatible clear craft finish. Always test the finish on a spare piece first and follow the product’s instructions.
For a floral glass-inspired appearance, use pale colors and small decorative accents rather than heavy layers of paint.
Creative Ways to Use Your Floral Hearts and Flowers
For Complete Cooking STEPS Please Head On Over To Next Page Or Open button (>)