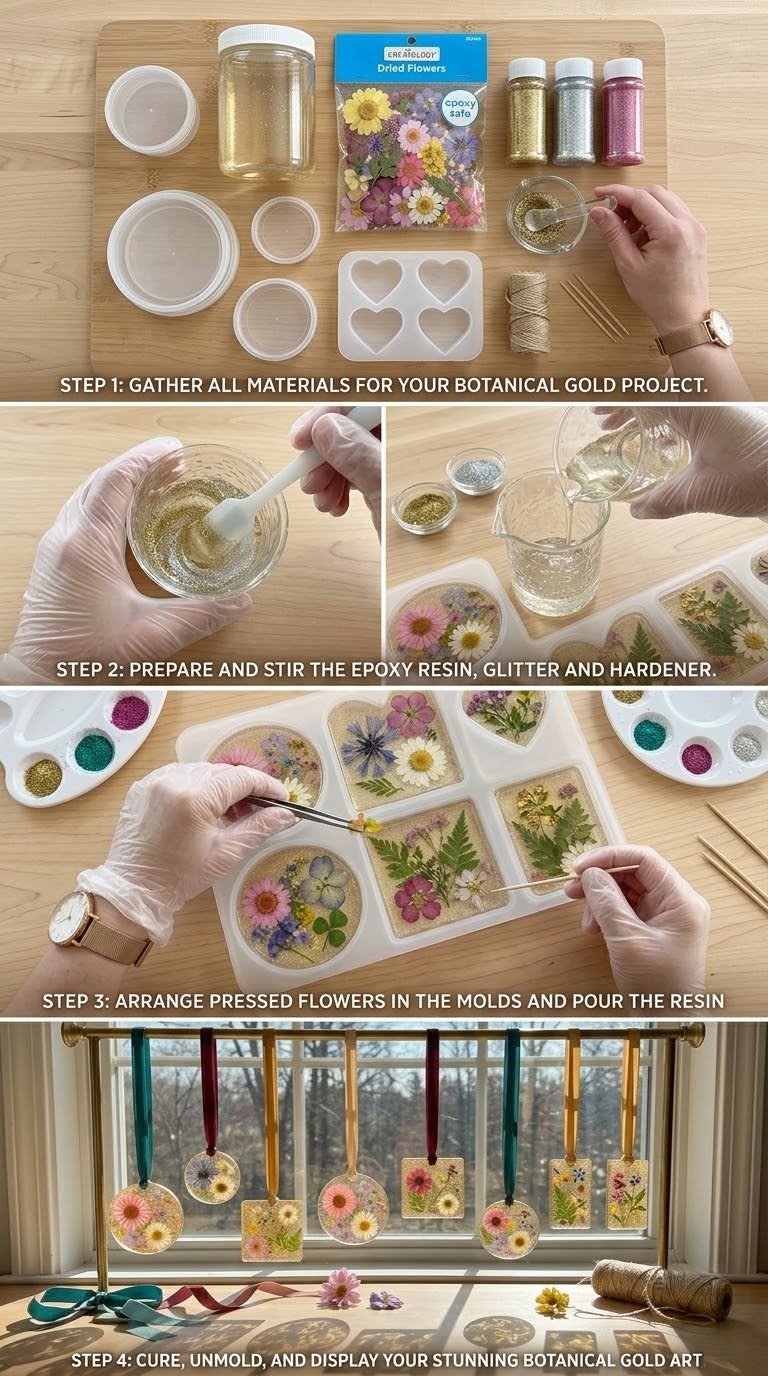
Bring a little sunshine and natural beauty into your home with these DIY botanical gold resin suncatchers! Combining delicate dried flowers, shimmering gold accents, and crystal-clear resin, this elegant craft transforms simple botanical elements into beautiful decorations that catch the light and create a stunning display near a sunny window.
Whether you’re looking for a creative weekend project, a handmade gift idea, or a unique way to decorate your home, these floral resin suncatchers are a wonderful choice. You can customize each piece with your favorite flowers, leaves, gold flakes, and decorative shapes to create something truly personal.
Why You’ll Love These Botanical Suncatchers
- Elegant appearance: Clear resin and gold accents create a sophisticated finish.
- Nature-inspired design: Preserve the delicate beauty of dried flowers and leaves.
- Customizable: Experiment with different botanical arrangements and shapes.
- Perfect for gifting: Handmade suncatchers make thoughtful gifts for birthdays, holidays, and special occasions.
- Beautiful window decor: Hang them near a sunny window to enjoy the colors and details illuminated by natural light.
Materials You’ll Need
- Clear casting epoxy resin and its matching hardener
- Dried flowers, small petals, or delicate leaves
- Gold leaf flakes or gold-colored resin-safe decorative flakes
- Silicone suncatcher molds
- Disposable mixing cups
- Stirring sticks
- Nitrile gloves and appropriate eye protection
- A level, protected work surface
- A small wooden stick or tweezers for arranging flowers
- A drill and suitable bit, if your mold does not include a hanging hole
- Ribbon, clear cord, or a decorative hanging chain
- Optional: gold-colored jump rings and small decorative charms
Important safety note: Follow the resin manufacturer’s instructions for mixing, ventilation, protective equipment, curing time, and disposal. Keep uncured resin away from skin, children, and pets. Do not use food utensils or work in an unventilated room.
Step-by-Step Instructions
Step 1: Prepare Your Botanical Materials
Choose small, completely dried flowers and leaves. Pressed flowers work especially well because their flat shapes are easier to arrange inside a mold.
Popular choices include baby’s breath, tiny daisies, fern leaves, and delicate rose petals. Make sure your botanicals are thoroughly dry, as moisture can affect the appearance and durability of the finished resin.
Separate the flowers by size and color before beginning.
Step 2: Prepare Your Workspace
Place your silicone mold on a level surface covered with a suitable protective sheet. Gather your resin, hardener, decorative flakes, and tools.
Put on the protective equipment specified by the resin manufacturer and ensure the room has the required ventilation.
If you plan to make several suncatchers, prepare all the botanical arrangements before mixing the resin.
Step 3: Mix the Clear Resin
Measure the resin and hardener precisely according to the manufacturer’s specified ratio. Some products use a ratio by volume, while others require a ratio by weight.
Stir slowly and thoroughly for the recommended time, scraping the sides and bottom of the mixing cup. Avoid vigorous mixing, which can introduce excess bubbles.
Never change the mixing ratio to make the resin cure faster or harder.
Step 4: Pour the First Layer
Pour a thin layer of mixed resin into the silicone mold.
This base layer helps position the botanical decorations and gives the finished suncatcher a clear, polished appearance.
If your design uses a layered effect, follow the resin manufacturer’s instructions for the appropriate recoat window.
Step 5: Arrange the Dried Flowers
Use tweezers or a wooden stick to position the dried flowers and leaves in the resin.
Try arranging a small cluster of flowers in one corner, creating a delicate botanical border, or placing a single flower in the center for a minimalist design.
Leave enough open space around the flowers so that sunlight can illuminate the natural details.
Step 6: Add the Gold Accents
Sprinkle a small amount of gold leaf flakes around the flowers. You can create a delicate gold border, scatter a few flecks throughout the design, or concentrate the gold near the edges.
Less is often more. Too many metallic flakes may obscure the flowers and reduce the amount of light passing through the finished piece.
Step 7: Complete the Pour
Slowly add more resin until the mold reaches the recommended fill level.
Use a wooden stick to adjust any floating flowers or decorative flakes. Check the design from different angles to ensure that the botanical details remain visible.
If bubbles appear, follow the manufacturer’s approved bubble-removal method. Avoid open flames or excessive heat, which can damage resin, create hazardous fumes, or deform the mold.
Step 8: Allow the Resin to Cure
Cover the mold with a clean, dust-free cover that does not touch the resin. Leave it undisturbed for the full curing period specified by the manufacturer.
Curing time varies depending on the product, temperature, humidity, and thickness of the casting. Do not remove the suncatcher or handle it as a finished item until it has cured sufficiently.
Step 9: Remove and Finish Your Suncatcher
Once fully cured, gently flex the silicone mold to release the finished piece.
If the design does not already have a hanging hole, create one only if the resin is suitable for drilling and follow the manufacturer’s safety guidance. Smooth any rough edges with an appropriate finishing method while using suitable dust protection.
Add a gold jump ring, decorative chain, or clear hanging cord to complete your suncatcher.
Step 10: Display Your Creation
Hang your botanical suncatcher near a bright window where natural light can highlight the flowers and gold details.
For a coordinated display, make several pieces in different shapes and sizes. You can also combine floral designs with fern leaves, tiny petals, or gold accents for a beautiful botanical collection.
Creative Design Ideas
For Complete Cooking STEPS Please Head On Over To Next Page Or Open button (>)